After a user submits their expense report(s), the manager must approve/reject them.
To Approve/Reject an Expense as a Manager:
Start on the EXP Homepage and select ‘Expense’

From the Expense Dashboard, select the ‘Hamburger’ menu in the top-right corner of the screen
From the dropdown menu, select ‘Expense Reports‘
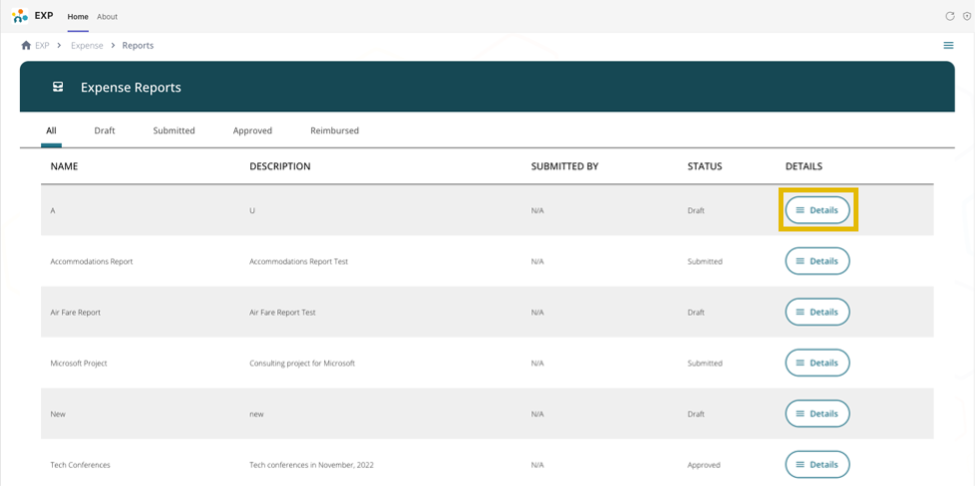
On the Expense Reports page, choose the entry you would like to work on and click ‘Details‘

Verify the Expense
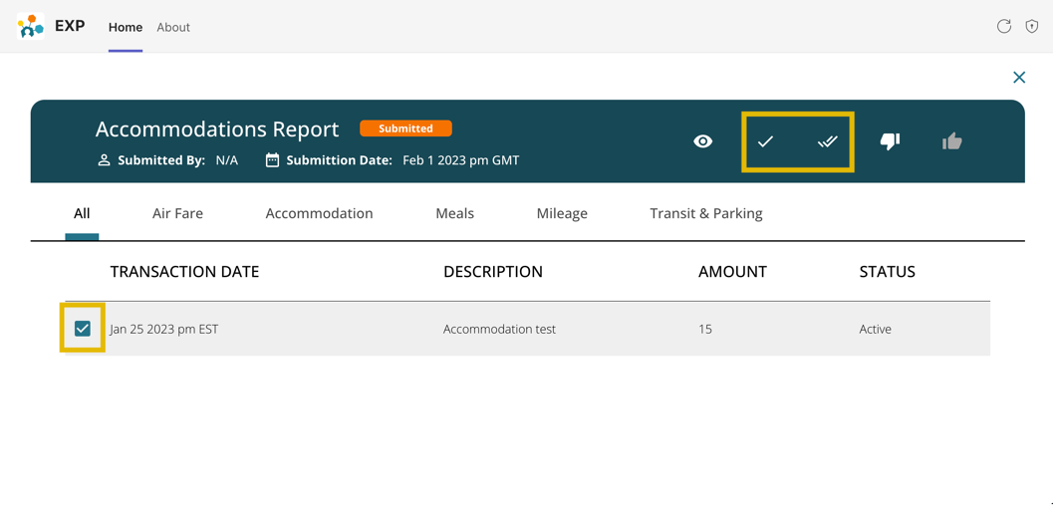
- Click the box to the left of the entry and select ‘Verify‘ or ‘Verify All‘
- Verify with receipt will verify the entry
- Verify without receipt will only allow the user to Reject
- To verify without receipt, click ‘Verify All‘ which will prompt the message “Verify all expenses within this report? Please be sure that all expenses are correct before verifying all.”
- Click ‘Confirm’ to verify, which will prompt the message “Successfully verified expense!” and the expense report status changes to Verified

Approve/Reject the Expense
Click the box to the left of the entry to select the expense
- To approve the submitted expense, click ‘Approve‘
- When you click ‘Approve,’ a pop-up message will appear saying “Approve the *Expense Report Name*?”
Once approved, the expenses within the report can no longer be opened.” - After clicking ‘Approve‘ a message will appear at the bottom of the screen saying, “Successfully approved expense report!“
- The expense report status changes to ‘Approved‘
- When you click ‘Approve,’ a pop-up message will appear saying “Approve the *Expense Report Name*?”
- To reject the submitted expense, click ‘Reject.’
- When you click ‘Reject‘ a pop-up message will appear saying, “Reject the *Expense Report Name*?“
- After clicking Reject, a message will appear at the bottom of the screen saying, “Successfully rejected expense report!“
- The expense report status changes to ‘Rejected.’

The user can see the expense entry and expense status changes to ‘Active‘ when changes are made.
The user can add to a new expense report and submit it again.
